Casper Signer in a dApp
This tutorial shows you how to connect the Casper Signer wallet to your website, show the balance of the account and send a transaction.
Step 1. Run a Mini Webserver
First, install the Casper JavaScript SDK and ViteJS to run a mini webserver. You will need the Casper JavaScript SDK to connect to a Casper node, retrieve information from the blockchain, and send transactions. ViteJS is a front-end build tool that helps bundle a JavaScript library and start a webserver.
Run this npm command to initialize your server and configure it to use JavaScript:
npm init vite@latest
- Choose a project name
- Select the default framework
- Select the default variant
Go to the main folder and install the necessary dependencies and the Casper JavaScript SDK:
    cd tutorial
    npm install
    npm install casper-js-sdk@next --save
    npm run dev
Step 2. Create a Simple UI to Interact with the Signer
Next, create a minimal user interface (UI) to interact with the Casper Signer. Open the index.html in the main folder and write the HTML code to create your UI elements. Here you can add buttons, fields for the user inputs needed to send transactions, and other elements. Here is the sample code:
    <div id="app">

    <!-- The button to connect your website into Casper signer wallet. -->
    <button id="btnConnect" >Connect</button>

    <!-- The button to disconnect your website into Casper signer wallet -->
    <button id="btnDisconnect" >Disconnect</button>

    <!-- The place where the public key will display. -->
    <h1 id="textAddress">PublicKeyHex </h1>

    <!-- The place where Balance will display. -->
    <h1 id="textBalance">Balance </h1>
    <h1>Transer</h1>

    <!-- The amount to send in the transaction. -->
    <!-- Minimal amount is 2.5CSPR so 2.5 * 10000 (1CSPR = 10.000 motes)  -->
    <label for="Amount">Amount - min amount 25000000000</label>
    <input id="Amount" type="number">

    <!-- The address that will receive the coins. -->
    <label for="Recipient">Recipient</label>
    <input id="Recipient" type="text">

    <!--The button that when clicked will send the transaction. -->
    <button id="btnSend" >Send</button>

    <!--The address of your transaction. -->
    <h1 id="tx"></h1>
    </div>
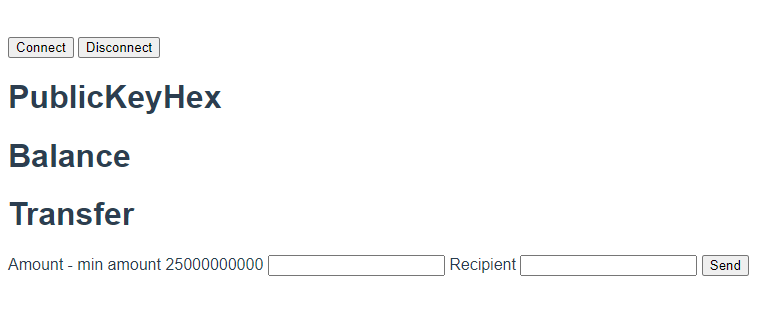
Below is the UI created with the sample code above.
After writing the HTML code, open the main.js file and write the code to import the casper-js-sdk to create the client and the services necessary to get account information and send transactions.
    import {CasperClient,CasperServiceByJsonRPC, CLPublicKey,DeployUtil } from "casper-js-sdk";

    //Create Casper client and service to interact with Casper node.
    const apiUrl = '<your casper node>';
    const casperService = new CasperServiceByJsonRPC(apiUrl);
    const casperClient = new CasperClient(apiUrl);
Step 3. Implement the connect/disconnect Button
Now that we have the UI and the imported library, it's time to interact with the Casper Signer wallet.
First, create the connect functionality for the button:
    const btnConnect = document.getElementById("btnConnect");
    btnConnect.addEventListener("click", async () => {
        window.casperlabsHelper.requestConnection();
    })
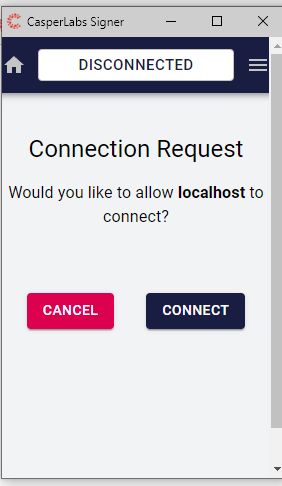
When clicking on the CONNECT button, the wallet will show a pop-up asking if you want to connect this site into the wallet:
Next, implement the disconnect functionality:
    const btnDisconnect = document.getElementById("btnDisconnect");
    btnDisconnect.addEventListener("click", () => {
        window.casperlabsHelper.disconnectFromSite();
    })
Step 4. Get the Account Balance
In the previous section, you learned how to connect to the Signer wallet. In this part, you will learn how to retrieve account information using the public key of an account.
Let's write the function to get basic account information, like the account's public key and balance.
    async function AccountInformation(){
        const isConnected = await window.casperlabsHelper.isConnected()
        if(isConnected){
            const publicKey = await window.casperlabsHelper.getActivePublicKey();
            textAddress.textContent += publicKey;

            const latestBlock = await casperService.getLatestBlockInfo();
            const root = await casperService.getStateRootHash(latestBlock.block.hash);

            const balanceUref = await casperService.getAccountBalanceUrefByPublicKey(
                root,
                CLPublicKey.fromHex(publicKey)
                )

            //account balance from the last block
            const balance = await casperService.getAccountBalance(
                latestBlock.block.header.state_root_hash,
                balanceUref
            );
            textBalance.textContent = `PublicKeyHex ${balance.toString()}`;
        }
    }
Add the AccountInformation function inside the btnConnect to display the information when connecting into an account:
    const btnConnect = document.getElementById("btnConnect");
    btnConnect.addEventListener("click", async () => {
    window.casperlabsHelper.requestConnection();
        await AccountInformation();
    })
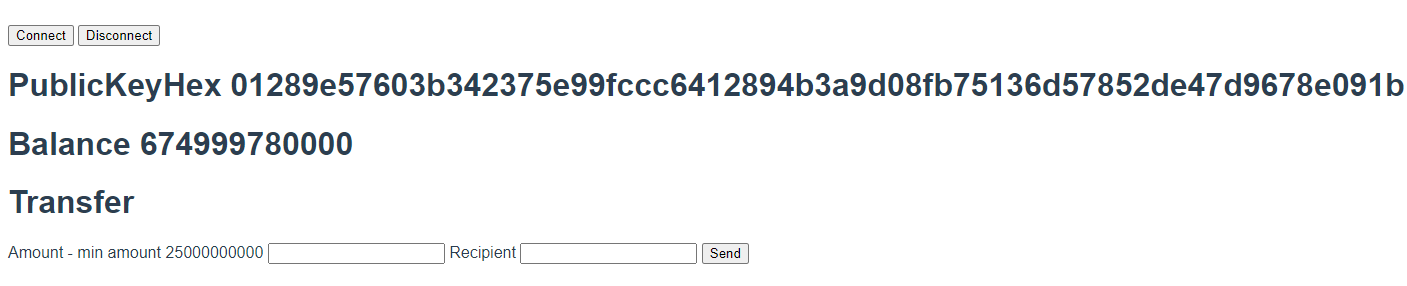
The result should be like this:
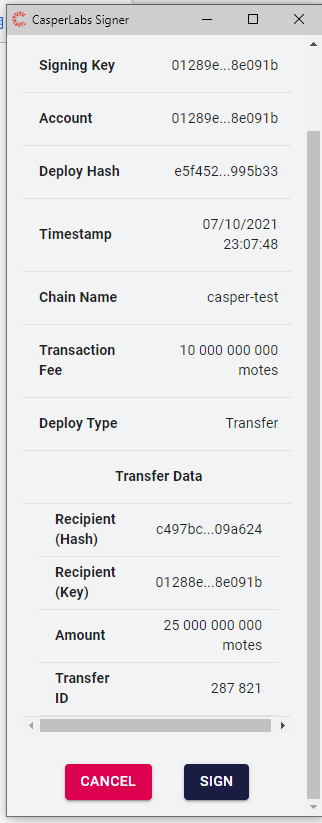
Step 5. Sign and Send a Transaction
With the connected Signer wallet on your website, it is possible to sign a transaction. The Casper Signer will not send the transaction but only sign the transaction using your account keys. Your application will need to send the transaction after the wallet signs it with the following code:
    async function sendTransaction(){
    // get address to send from input.
    const to = document.getElementById("Recipient").value;
    // get amount to send from input.
    const amount = document.getElementById("Amount").value
    // For native-transfers the payment price is fixed.
    const paymentAmount = 10000000000;

    // transfer_id field in the request to tag the transaction and to correlate it to your back-end storage.
    const id = 287821;

    // gasPrice for native transfers can be set to 1.
    const gasPrice = 1;

    // Time that the deploy will remain valid for, in milliseconds
    // The default value is 1800000 ms (30 minutes).
    const ttl = 1800000;
    const publicKeyHex = await window.casperlabsHelper.getActivePublicKey();
    const publicKey = CLPublicKey.fromHex(publicKeyHex)

    let deployParams = new DeployUtil.DeployParams(publicKey,"casper-test",gasPrice,ttl );

    // We create a public key from account-address (it is the hex representation of the public-key with an added prefix).
    const toPublicKey = CLPublicKey.fromHex(to);

    const session = DeployUtil.ExecutableDeployItem.newTransfer( amount,toPublicKey,null,id);

    const payment = DeployUtil.standardPayment(paymentAmount);
    const deploy = DeployUtil.makeDeploy(deployParams, session, payment);

    // Turn your transaction data to format JSON
    const json = DeployUtil.deployToJson(deploy)

    // Sign transcation using casper-signer.
    const signature = await window.casperlabsHelper.sign(json,publicKeyHex,to)
    const deployObject = DeployUtil.deployFromJson(signature)

    // Here we are sending the signed deploy.
    const signed = await casperClient.putDeploy(deployObject.val);

    // Display transaction address
    const tx = document.getElementById("tx")
    tx.textContent = `tx: ${signed}`
    }

    const btnSend = document.getElementById("btnSend")
    btnSend.addEventListener("click",async () => await sendTransaction())
The resulting UI elements will look like this: