Deployment
Now that you have implemented a smart contract for CEP-47, it's time to deploy it to the network. You will use a JavaScript client with in-built TypeScript (TS) classes to execute the contract deployment. The JS client also resides in a separate repository. Clone that repository to your machine and proceed with these deployment steps.
Prerequisites
- Set up your machine as per the prerequisites
- Ensure you have set up an account with a public and secret key pair to initiate the deploy
- Since we are deploying to the Casper Testnet, ensure your Testnet faucet account contains enough CSPR tokens to perform the contract execution. Follow fund your account guide to add CSPR tokens to your account
- CSPR tokens are used to pay for the transactions on the Casper Network. Follow the transfer tokens guide to learn more about token transferring on the Casper Testnet
Basic Flows of the Deployment
Here are the basic steps for deploying your contract on the Casper Network.
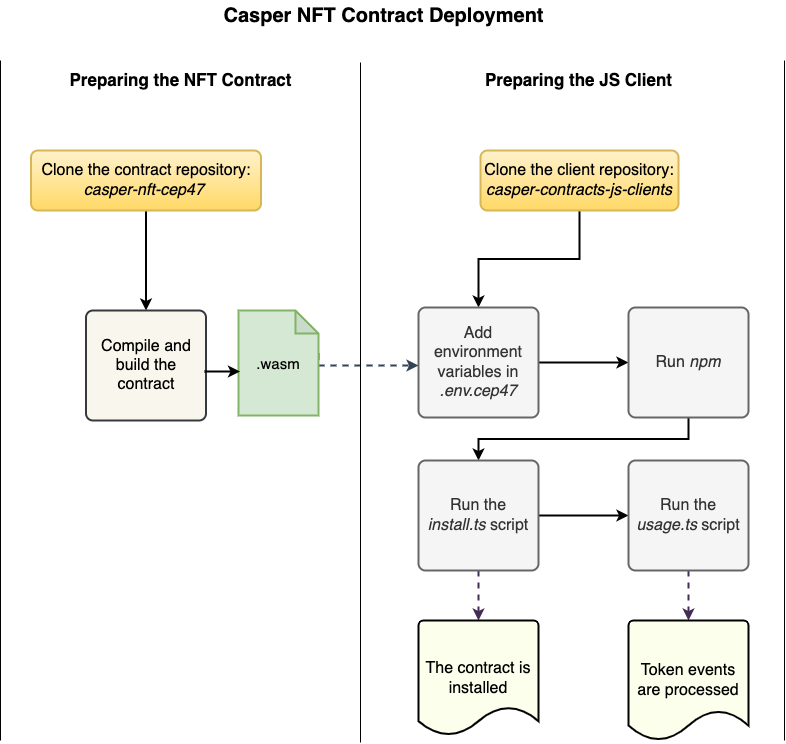
Casper Repositories
You will be using two Casper repositories for the deployment process.
- casper-nft-cep47 - a repository containing the implementation of the NFT, a.k.a. CEP-47 smart contract, required utility classes, and corresponding test suite to work with the CEP-47 token.
- You will be using the cep47-token.wasm file from this repository for the deployment. The .wasm file is the compiled implementation of the CEP-47 contract.
- casper-contracts-js-clients - a repository containing a JS client for the CEP-47 contract and other supporting classes to run the client.
- You will be executing the install.ts file for the deployment.
Deploying the Contract
1. Preparing the CEP-47 contract repository
Refer to the contract preparation step to prepare the NFT contract for deployment. This step will make the build environment, create the target location and compile the contract to a .wasm file.
- Output from this would be a Wasm file (Eg: *cep47-token.wasm), which is later used by the JS compiler for contract deployment.
2. Preparing the JS client repository
The JS client can be used to install the smart contract on the Casper Network and perform further actions with the contract. We are using the JS client classes to invoke the NFT installation on the network using a pre-defined set of environment variables.
Clone the casper-contracts-js-clients repository using the following command.
git clone https://github.com/casper-network/casper-contracts-js-clients.git
3. Adding the environment variables
In the root folder of the newly-cloned repository, copy or rename the sample .env file from .env.cep47.example to .env.cep47:
  cd casper-contracts-js-clients
cp .env.cep47.example .env.cep47In the .env.cep47 file, replace the following values with your own:
WASM_PATH- Path to the compiled cep47-token.wasm fileCHAIN_NAME- Network name, e.g. casper for Mainnet or casper-test for TestnetNODE_ADDRESS- Address of the node's JSON-RPC server. Use port 7777 or whatever is specified as the rpc_server.address in the node's config.toml, and append /rpc to the path. Example: 195.201.174.222:7777/rpcEVENT_STREAM_ADDRESS: Address of the node's event stream server. Use port 9999 or whatever is specified as the event_stream_server.address in the node's config.toml, and append /events/main to the path. Example: 195.201.174.222:9999/events/mainMASTER_KEY_PAIR_PATH- Path to the generated key pair for your signatureUSER_KEY_PAIR_PATH- Path to the generated key pair, which in this case would be the same as yourMASTER_KEY_PAIR_PATH(In certain test scenarios, this could be a different key pair)
note
You must update the above list of parameters to align with your working environment. If you need an IP address for a node on the network, follow this guide.
4. Building the JS client
Run the following commands to install the dependencies and build the client:
npm install
npm run dist
5. Deploying the contract
Run the following command to deploy and execute the CEP-47 installer. The command executes the ./e2e/cep47/install.ts file.
npm run e2e:cep47:install
A Successful command execution produces similar output as below.
Console output for contract installation
... Contract installation deployHash: 0dcef7e7bddbc5a666aff1afbc03cf4797e3736c71fe05aee9944a26c4eeefab
... Contract installed successfully.
... Account Info:
{
  "_accountHash": "account-hash-179cd876d5c74317cce9c48d718a040e6e909063d7d786de0c5c6421a09fa803",
  "namedKeys": [
    {
      "name": "bdk_nft_contract_contract_hash",
      "key": "hash-a47d35d835a5fa8a1bcd55a4426dc14e21da9b876c1617742f18813737a4ece0"
    },
    {
      "name": "bdk_nft_contract_contract_hash_wrapped",
      "key": "uref-ff9b562d357d9a258acb2b3798f82c6ec5db49a8852e2e96b0ed4b1faf873206-007"
    },
    {
      "name": "contract_package_hash",
      "key": "hash-2468facdc9a6f324f8442584fd46d911e3ac9b434dfa79435567bf71f9b8bd23"
    }
  ],
  "mainPurse": "uref-a33e25cb1e6baa38e8306dba0492183c65cb41db3dbe8f69546868a4c0cfd0d9-007",
  "associatedKeys": [
    {
      "accountHash": "account-hash-179cd876d5c74317cce9c48d718a040e6e909063d7d786de0c5c6421a09fa803",
      "weight": 1
    }
  ],
  "actionThresholds": {
    "deployment": 1,
    "keyManagement": 1
  }
}
... Contract Hash: hash-a47d35d835a5fa8a1bcd55a4426dc14e21da9b876c1617742f18813737a4ece0
6. Installing the contract
This section clarifies how the contract deployment happens through the install.ts file.
Firstly, the client reads the contents of the .wasm file into the getBinary constant.
export const getBinary = (pathToBinary: string) => {
  return new Uint8Array(fs.readFileSync(pathToBinary, null).buffer);
};
Then, it creates the token metadata fetched from the .env.cep47 file.
const TOKEN_META = new Map(parseTokenMeta(process.env.TOKEN_META!));
It also fetches the keys for signing from the .env.cep47 file.
const KEYS = Keys.Ed25519.parseKeyFiles(
  `${MASTER_KEY_PAIR_PATH}/public_key.pem`,
  `${MASTER_KEY_PAIR_PATH}/secret_key.pem`
);
Then, it fetches the node address and chain name of the network being targeted.
const test = async () => {
  const cep47 = new CEP47Client(
    NODE_ADDRESS!,
    CHAIN_NAME!
  );
Next, it runs the installer by calling cep47.install(). This function takes the Wasm file path, token metadata, payment amount, and keys as parameters. The result is stored in installDeployHash.
const installDeployHash = await cep47.install(
    getBinary(WASM_PATH!),
    {
      name: TOKEN_NAME!,
      contractName: CONTRACT_NAME!,
      symbol: TOKEN_SYMBOL!,
      meta: TOKEN_META
    },
    INSTALL_PAYMENT_AMOUNT!,
    KEYS.publicKey,
    [KEYS],
  );
Then the generated installation deploy hash is sent to the node address that you specified in the .env file. At this point, you can see the "... Contract installation deployHash: " message on the console output.
const hash = await installDeployHash.send(NODE_ADDRESS!);
After that, check if the deploy is successful and retrieve the account information using the node address and public key. Next, you can see the "Contract installed successfully." message on the console.
await getDeploy(NODE_ADDRESS!, hash)
let accountInfo = await getAccountInfo(NODE_ADDRESS!, KEYS.publicKey);
Finally, the contract hash is derived from account information, and you can check the installed contract hash on the console.
 const contractHash = await getAccountNamedKeyValue(
    accountInfo,
    `${CONTRACT_NAME!}_contract_hash`
  );